craft projects, life

Flower power

I hope everyone in the US had a great long weekend for Labor Day! I know we did – we went roller skating, and to the Children’s Museum, did lots of swimming, and watched some movies. Very fun and relaxing, despite the HEAT. It’s hard to believe fall is around the corner when it’s more than 90 degrees F outside. 

Today, I wanted to share a craft that my mom made for me! One of her neighbors sells jars of flowers, and I commented on how cute they were. So my mom whipped up three for me and BK – red, blue, and green. She just bought Ball jars at the store and covered them with craft paint. Then, she ripped up some leftover fabric and made bows. 

Another of her neighbors has a patch of wildflowers that she told my mom she could help herself to, so my mom has been bringing me enough flowers to fill 2 of the jars every few days. I keep one on the dining room table and one on the kitchen table, and they are lovely little punches of summer color! 

craft projects, sewing

FO: Valentine’s Countdown

Yesterday, I promised a full post on the Valentine’s Countdown, and thanks to some lovely comments on it, I decided to do the full post today!

stitching-countdown

The Sugar House Shop, where I purchased the pattern for BK’s advent calendar, posted some new countdowns earlier this month, and I found I was helpless to resist. When I purchased materials for the Christmas calendar, I had also purchased the materials for the birthday countdown to get free shipping (I know I’m not the only one who commits to multiple projects just for free shipping, right?). And it just so happened that the ice cream colors I chose for the birthday countdown were almost an exact match for the Valentine’s Countdown.

I decided to see how much I could squeeze out of the 9×12″ felt sheets I had purchased for the birthday countdown, and it easily handled an ice cream scoop, two hearts and I still have half of it left over (yes, this means I will probably make even more of these projects :-)).

I swear, this project just flew by. I enjoyed it so much!

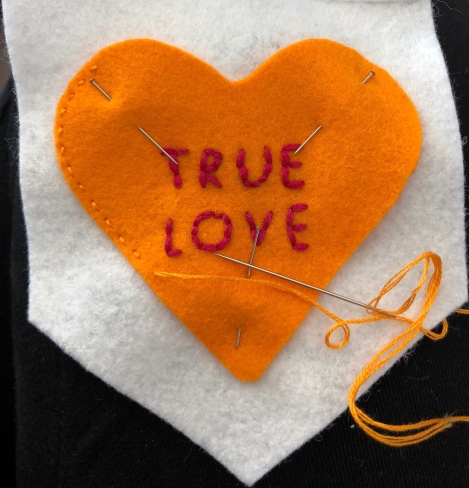
I only made one small change, which is that the pattern called for some printable Stick ‘N Stitch, which I could not find locally. I did some research, and found out that the new printer Mr Snips recently bought for us allowed you to print a mirror image of your file. So I did that, and used the iron-on transfer pen instead. It worked out great!

countdown close-up

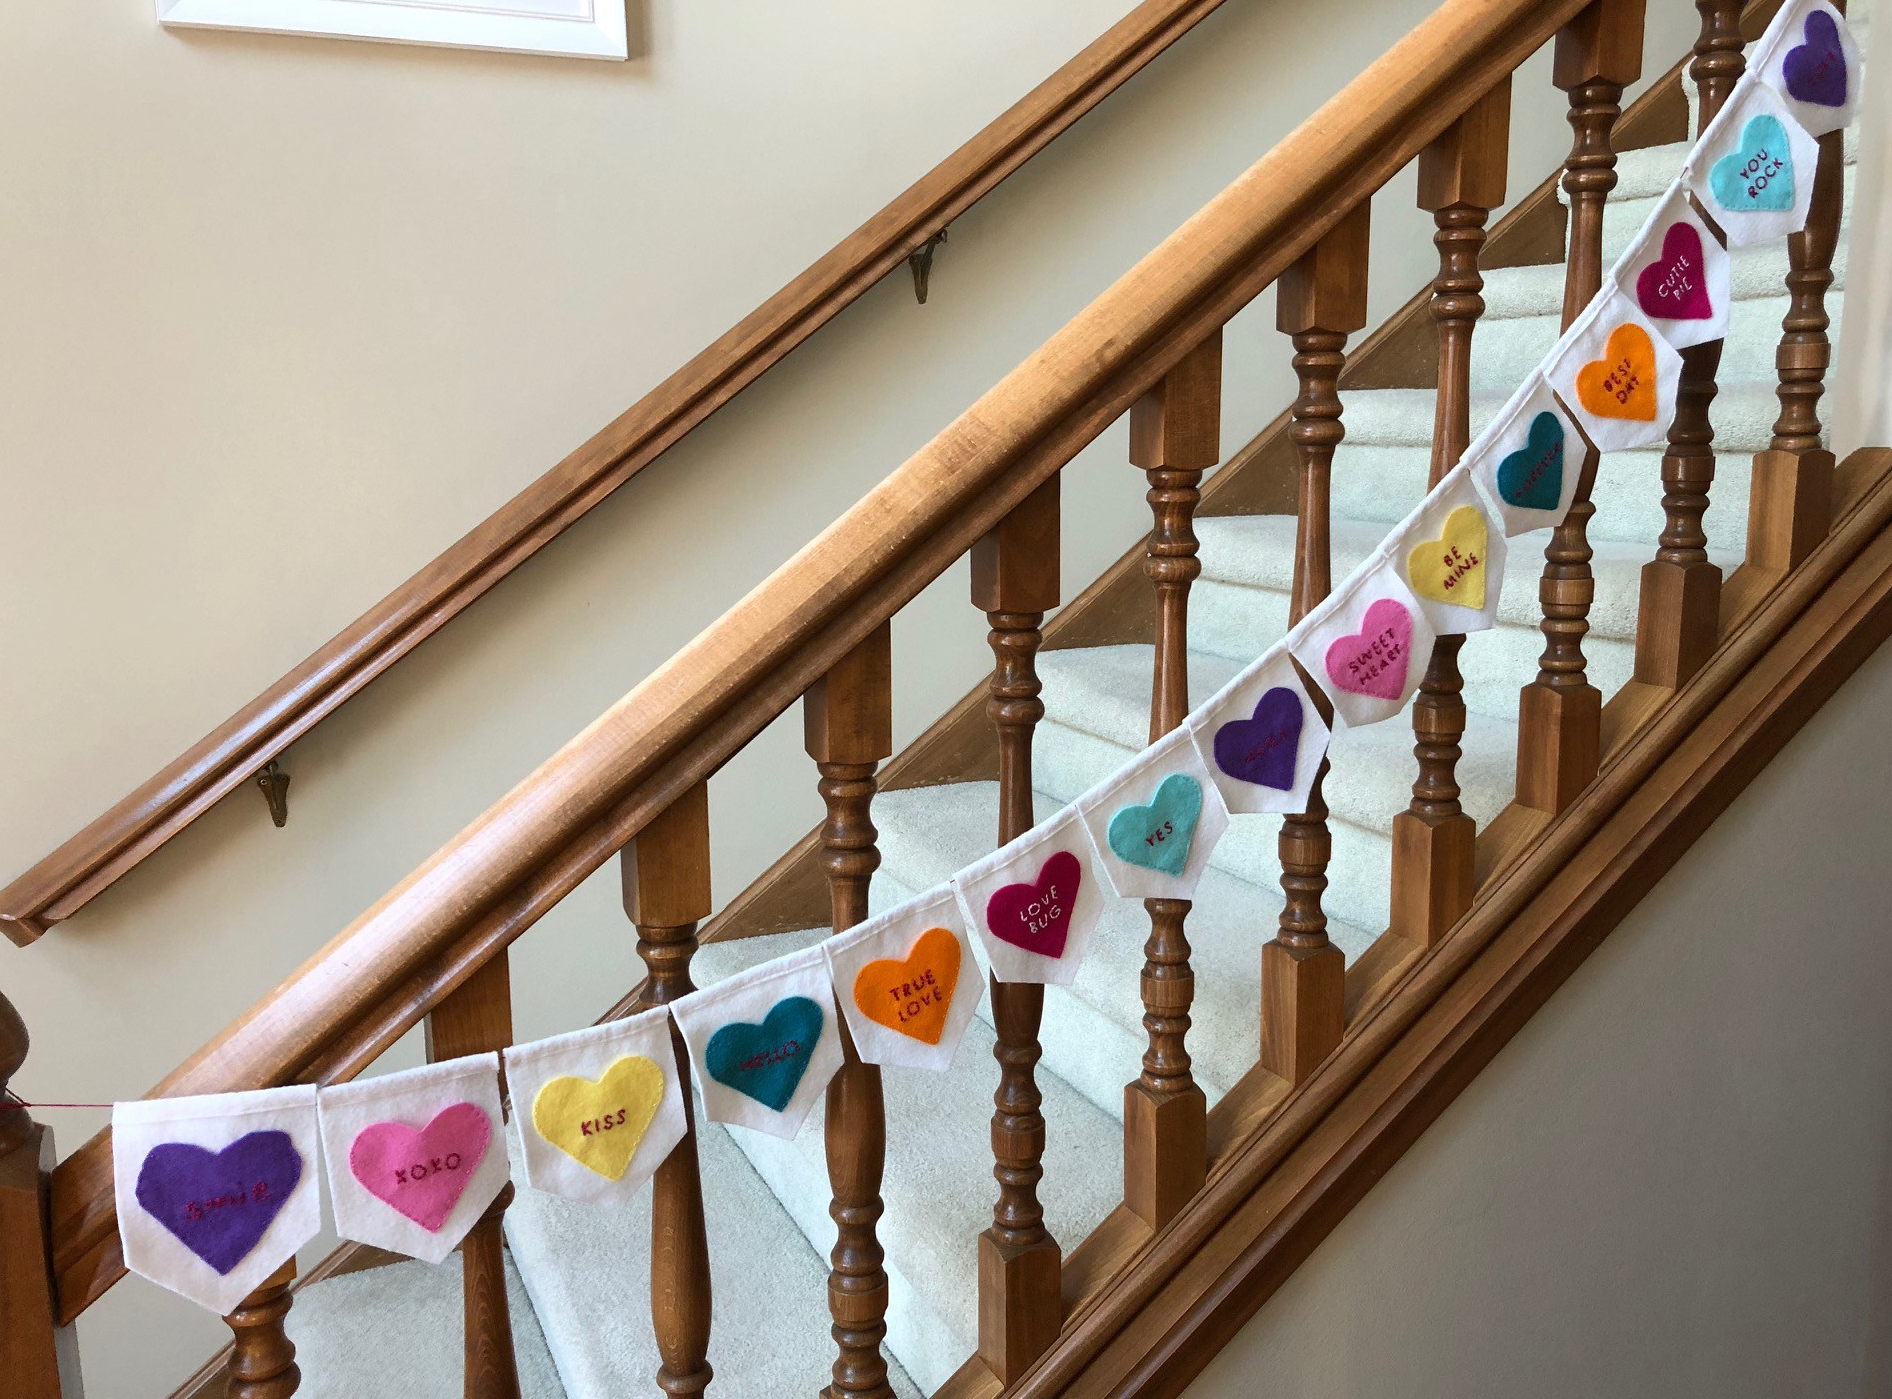
I only have one regret on this project, and it is that I only used the white floss on the dark pink hearts. I think I should have also used it on the purple. BUT – BK loves dark pink so much and she really likes the purple/pink combo, so I’m trying not to feel too bad about it. It’s difficult to read the purple ones from far away, but just fine if you’re near.

In fact, she loved the combo so much, she requested it for my one addition to this project. I recently found out that she can write her name backwards flawlessly, so I had her write her name backwards in iron-on transfer pen, and then I transferred it to a purple heart. I stitched over it with some pink, and now we will have a permanent memento of how sweetly her little 4-year-old hands write her name in 2018. It is, in fact, my favorite heart. And she will really like it because it means she will get a 15th chocolate out of it. I plan to fill the little hearts with a combination of Hershey’s Kisses and Andes Mints, both of which are the perfect size for these sweet little pockets. countdown with candy

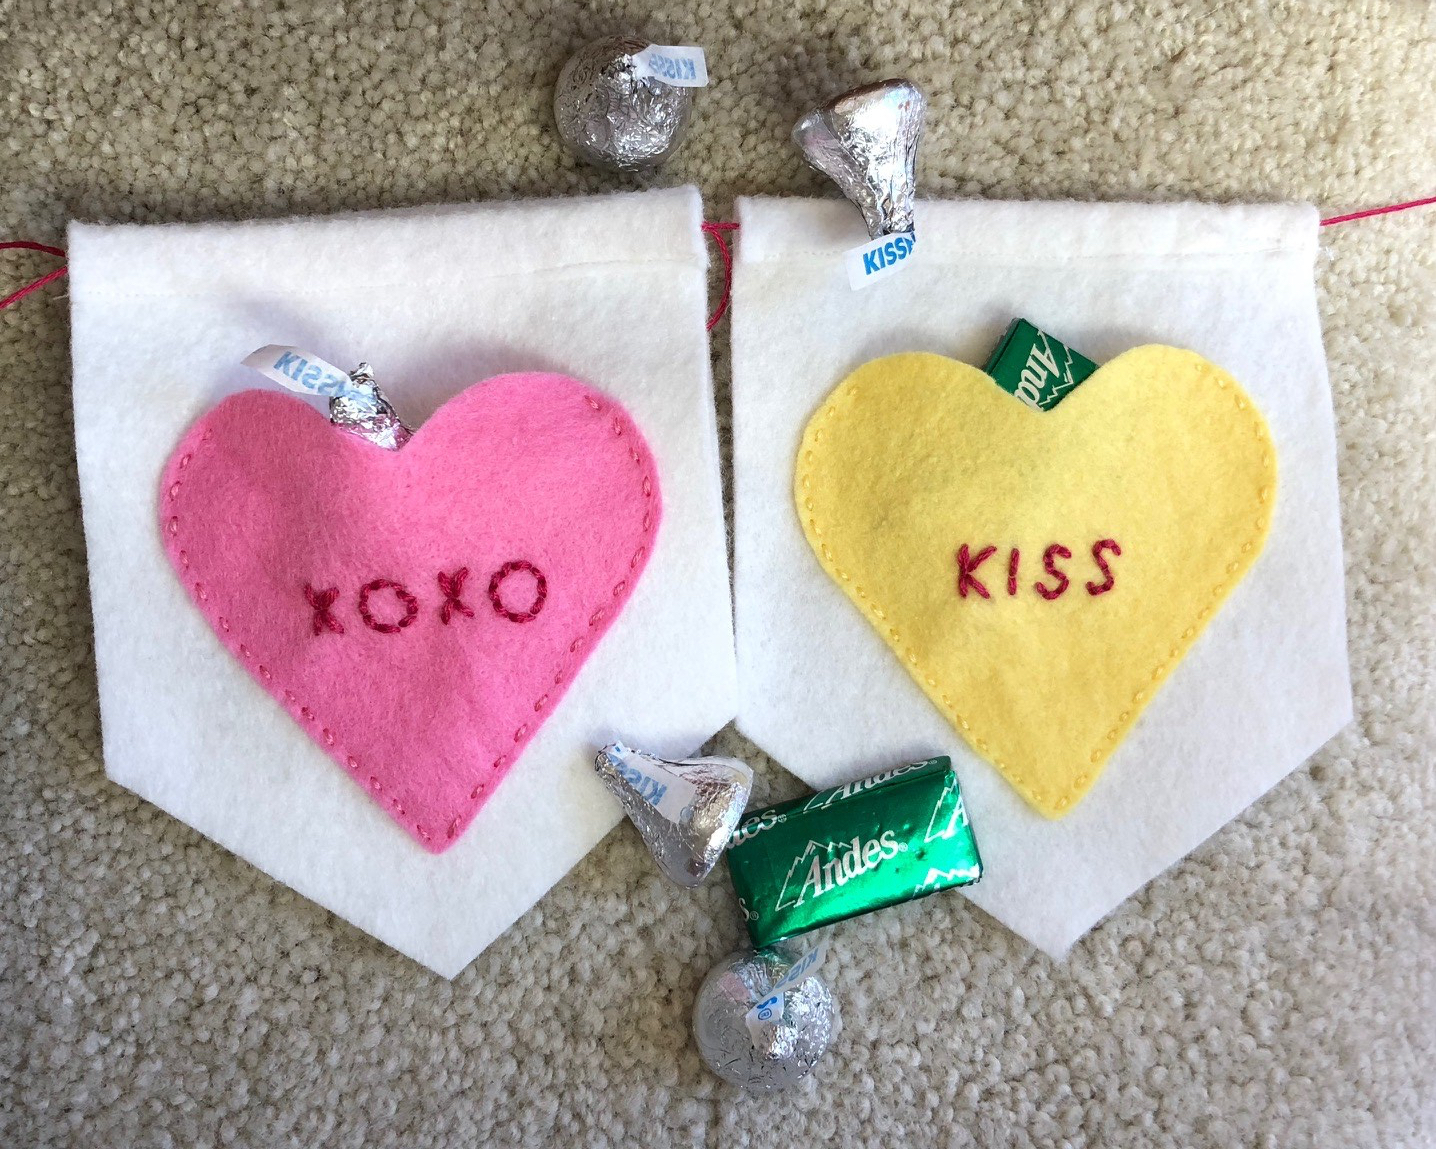
Here’s the big ta-da!

full-countdown

I’ll leave you with just one pro tip on this one. When threading the floss through the top to string them all together, using a safety pin was making me crazy. I pulled out a long plastic tapestry needle from my knitting bag, and it sailed through the tops like a breeze!

Now bring on January 31st, so we can fill this up! 🙂

craft projects, life

FO: Halloween Spider Yarn Wreath…tutorial including lessons learned!

How often do you see something online or in a store and think: “I could make that!” It happens to me all the time. But I am increasingly having a second conversation with myself which is – is it worth my time? Having a baby and the subsequent rare free time really make you value your time. Is your time more valuable than the amount you’d save by making it instead of buying it already finished?

Now, in many cases, like knitting, saving time or money is not the goal for me. I knit because I like to, and I guess in that way I am a process knitter (though I am also driven by the end goal of finishing something lovely and knowing I made it myself!).

In other cases, like home decor, I waffle a bit on what I should do. In this instance, I saw a beautiful wreath while I was browsing on Etsy (which I must stop doing – it makes me want ALL THE THINGS – especially the Halloween things). As of today, I cannot find the Etsy listing any more, so I can’t credit the original creator, but this is the image (courtesy of Google image search). And I thought: “It involves Halloween and yarn – amazing! I could make this! And save money! And not have to pay a bunch for shipping! Let’s do this!”

So my mom, Baby Knitsnips and I headed out to the craft stores to pick up supplies. It turned out that between me and my mom, we had a lot of the things we needed already. Here’s what I used that you will need:

Black Yarn: $1.92 (Red Heart Super Saver)
Orange Yarn: from my stash (Vanna’s Choice)
Light Green Yarn: from mom’s stash (Cascade 220)
Dark Green Yarn: from mom’s stash (Caron One Pound)
Dark Purple Yarn: from mom’s stash (Caron One Pound)
Bright Purple Yarn: from mom’s stash (Caron One Pound)
Hot Glue Gun and Glue: mom’s
Pipe Cleaners:  $0.87
1 package of 1 in Smoothfoam balls: $1.66
1 package of 1.5 in Smoothfoam balls: $2.56
1 package of 2 in Smoothfoam balls: $3.27
1 package of 2.5 in Smoothfoam balls: $3.27
Wire wreath frame: $1.79
Googly Eyes: from mom’s stash
Wire Staples: dad’s

Here’s what I used that you will not need:

Fabric Tack: mom’s
Straight Pins: mom’s
Wired Stakes:  $1.79

Total cost: $17.13

Here’s how you make one. Lessons learned from this project will be in bold (and there are a lot of them).

  1. I tied four lengths of yarn to the wire frame to make two intersecting Xs. Then I wrapped yarn in a spiral around these base pieces to create a spider web. It didn’t stay quite as taut as I wanted it to, so I used some black thread to tie the intersections to where I wanted them to remain. Halloween wreath in progress
  2. I started by using some fabric tack spread on a small portion of the Smoothfoam balls and wound the yarn around it until all the white was covered. I should have started by using hot glue instead of the fabric tack. But Mom had kindly left the glue gun for my use at my house, and I had started the wreath project at her house. I should have just driven home to get it, but I was excited about starting and decided to make due with the fabric tacky stuff. It was a MESS, got stuck all over my fingers which attracted yarn fuzz, was hard to get off my hands, and didn’t hold nearly as well as hot glue.
  3. When I was done wrapping each ball, I used the little stake with wire attached to drive the end of the yarn into the Smoothfoam. This did make the end pretty secure, but it was a beast to drive the stakes through the foam. In the end, my dad started hammering them in for me. The premise of using these wired stakes seemed like a brilliant idea, but when it came to attaching the balls to the wreath form, it didn’t really work. You don’t need the stakes – this is another case where you should just hot glue the end down. We used the hot glue method on the smallest ones, and it worked very well.
  4. I then tried to use the wire to attach each ball to the wire wreath form. I couldn’t make it tight enough to keep the balls in the right place. I also used the wreath upside down, in the idea that it would provide a nice cradle and keep it more secure. On reflection, I think I would have used it the intended way, but this wasn’t really a problem.
  5. Instead, I ended up using spare yarn and a tapestry needle to sew the balls onto the wreath by picking up a few strands on each ball and tying it around the frame. This may also have been a mistake as it encouraged some unraveling. Again, I would have used hot glue! We hot glued the smallest size near the end of the project, and that worked nicely.
  6. My mom helped me out by cutting 3 balls in half – one large, one medium, and one small – with a knife to make my spiders. I used both halves of the small one, and just one half of the other two. I wrapped them in black yarn like the others.
  7. I cut lengths of pipe cleaner for each spider that seemed proportionate to the size of the spider. I initially put these onto the spider using a bent straight pin as a kind of makeshift staple. That didn’t work, so my dad got out some staple-like nails he had, which I think are meant to tack wires in. My mom hammered those into the spiders – you could use just one staple for each and put all the lengths of pipe cleaner through one and then fan out the legs. I think this is another instance where you could use hot glue, but the staples worked well.
  8. Mom then helped me hot glue some googly eyes on each spider. Mom had multiple sizes, so we used large for the medium and large spiders, and medium ones for the two small ones.
  9. We hot glued each spider onto the wreath.
  10. Then mom and I looked at the wreath to identify any gaps and then hot glued the smallest ones where we needed the extra coverage.
  11. The final step was to wrap a pipe cleaner around the back of the wire frame to use as a hanger.

Halloween wreath completed and displayed

I would have never finished this project without my mom. I was starting to despair a little when a few strands of yarn started to unravel and I didn’t think it looked as nice as I wanted it to. I really considered giving up. I lamented that I should have just paid the lady on Etsy for one that was already done. But, like always, mom stepped in, helped me make a few adjustments (and we started wielding the hot glue gun all over the place!), and it turned out really nicely! Now, every time I walk past it, I think: “It’s so cute! I can’t believe I considered giving up on it!”

So, now it’s your turn. If it’s worth it to you to know you made something really cool instead of buying one from someone else (and there are still very similar listings on Etsy if you’re interested – or if you start and give up. :-)), learn from my experience and make yourself a wickedly cool wreath!

rug hooking

Venturing into rug hooking: featuring Frankenstein

I’ve mentioned before that Halloween is one of my favorite times of year. It’s also one of my favorite times to craft. When I heard my LYS was going to do a Halloween-themed rug hooking project, my interest was piqued. Since the shop sells rug hooking supplies, I’d always been interested in trying, but needed the motivation that making a small Frankenstein brought. So on Tuesday night, I bought myself a chai latte (my fall drink of choice) and headed on down to the LYS to learn about rug hooking!

rug hooking with a chai

My first row turned out a little inconsistent, but by the time I hit the second side I was feeling more confident. It was suggested that I outline all my parts first and I quickly became addicted as I wanted to get to the next color and next part – a bit like the excitement of knitting self-striping yarn and trying to knit faster to get to the next color.

I’m hooked … Pun intended.

I worked for 3 solid hours on my little project, and this is what he looks like now:

Frankenstein

The little picture on the right is what he will look like when he is done.

I have to say that I have not stopped thinking about wanting to work on him since Tuesday. But I’ve had obligations this week that have kept me from open studio time at the shop. I have to do it there because I am borrowing both the frame and the hook.

I haven’t decided yet what I will do with him when I am done, but am thinking of making him into a little pillow on a ribbon that BK cold hang in her room. Regardless, I love his cute little face and can’t wait to work on him more!! I am even considering adding rug hooking supplies to my Christmas list, but I want to make sure the obsession will continue long enough to justify the investment. The only hesitation I have with doing more and more of this is that I don’t know what I will do I with my finished projects – unlike knitting where most of my projects are very practical. Any ideas?